

It’s very hard these days to look on a forum and not see someone posting about Izotope’s RX suite of plugins – currently on the 10th generation. Many people have offered forth the opinion that it’s an essential purchase for voice overs. So here’s my contribution to the discussion. And I’m going to disagree with many people, and at the same time agree with them.
What is RX10?
So the immediate question is what is this thing that causes all the fuss? RX10 is a suite of plugins, and a standalone editor, that offer some very powerful processing options for audio restoration and polishing.

It includes things like:
- De-clipper for if your recordings have peaked above 0dB (technically impossible, but you know what I mean)
- Music re-balancer for tweaking a mix to make the vocals stand out a bit more (or the drums, etc.)
- De-reverb plugin to improve the clarity of your audio a bit and many other modules to improve the quality of a bad recording.
- The standalone editor also includes a lot of processes that you’d expect in a regular editor like some EQ, signal generators, normalisation, batch processing and loudness controls.
It comes in 3 different price levels – essential, standard and pro. The prices of these reflect the number of plugins and processes you get. There’s a comparison chart here. It is very good at what it does, and I use it fairly regularly.
What’s the difference between RX10 and RX9?
Those of you with beady eyes may have noticed already that this blog used to be about RX9 (what do you mean you haven’t memorised all my blogs word for word?) but has now been updated to RX10. So why update rather than write a new blog? Firstly because I didn’t have time, and secondly because what I wrote about RX9 is still true for RX10. But we should think about what’s different between the 2 so you can figure out whether it’s worth upgrading from RX9 to RX10 if you haven’t already.
Most of the changes in RX10 are small tweaks under the hood, but there are two and a half things that are worth mentioning.
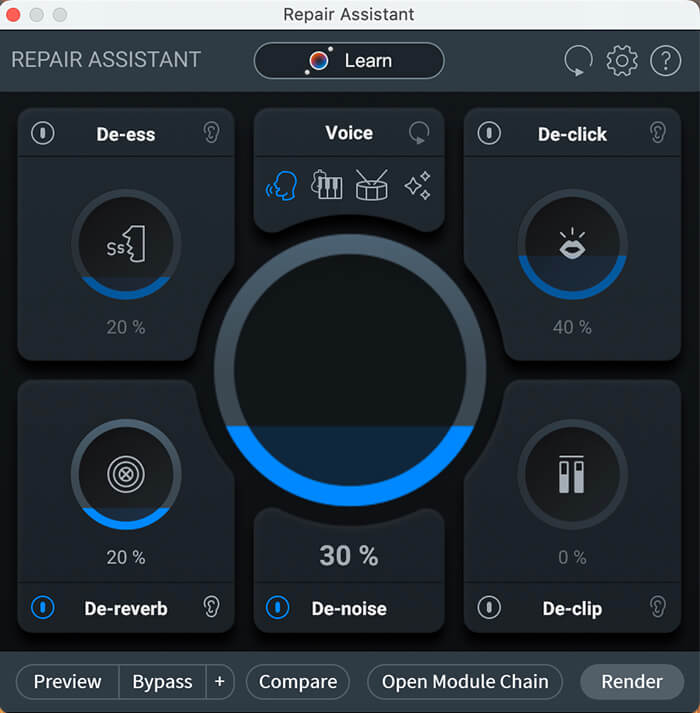
Repair assistant
Number one is the repair assistant has been redesigned and is a lot better than it used to be. Repair assistant automates the repair process by examining your audio, identifying issues and setting the parameters to restore your audio to good condition. I never bothered with it in previous versions of RX as it didn’t do a very good job. But in RX10 it’s a lot simpler layout and yields better results. I still don’t particularly use it, but I entertain the idea of using it more than before.
Text navigation
The second thing is text navigation. This is basically a speech-to-text functionality that places lots of tabs across the top of your waveform/spectral view so you can easily navigate to the sentence you need to. It also incorporates multiple speaker recognition by putting the different speakers in different colours. This all works fairly well – although it often identifies me as multiple speakers. Izotope themselves admit that this is pretty much still in Beta, so it will improve with future updates, but for now it’s quite usable if you need this sort of thing.
The other thing I want to mention is that there have been some big improvements made to the de-hum module. But as we work in the controlled environment of the studio we don’t need to de-hum what we record, so that one only counts as half a thing.
There are other tweaks too, but these are the main interesting ones.
Why shouldn’t voiceovers use RX10?
All of this sounds amazing. Some of those modules look like they’re directed specifically at voice overs – mouth de-click, de-plosive, breath control, voice de-noise and de-ess for example. So why shouldn’t a voiceover buy RX10? It’s because of what it is. It’s an audio restoration suite.
As voice artists we’re doing all our recording in a controlled environment where we don’t have noise interruptions (most of the time!) and we control the environment so it isn’t reverberant. We don’t need audio restoration. Or we shouldn’t.
I see too many voiceovers who have a noise reduction process as a part of their post-production schedule for every job and it makes me cross. If you need to use noise reduction on every job you do you really need to improve your recording environment. If you don’t need to run a noise reduction process, then don’t. Noise reduction processes – RX10 included – run the risk of damaging your audio, taking bits out that are part of the program, or leaving artefacts in the audio.
I cannot state enough that voiceovers shouldn’t need most of what RX10 has to offer.
I use RX10 fairly regularly because I do get given some audio restoration jobs from clients. The tools it presents for that purpose are very powerful, but they have limitations. As a voiceover, you should never hit those limitations, but you can still get into situations where you’re over-processing and doing more harm than good.
Why should Voiceovers use RX10?
Because it’s very good!
Those aforementioned processes in particular can be helpful in creating some highly polished great quality audio. But over-use it and it can just create different problems.
How should voice overs use RX10?
With care!
There are some RX10 modules that are worth their weight in gold.
Rob holds regular Izotope RX webinar training for voice overs. To find out when the next course is running, visit our RX Webinar event page.
Mouth de-clicker
The best example of this would be the mouth de-click. If you buy the Elements edition of RX10 you get a de-click, and it is possible to successfully get rid of mouth clicks with this, depending on exactly how your clicks sound.

The regular de-clicker isn’t looking for mouth clicks, the algorithms are looking for electrical clicks, dropped samples and the like. If you upgrade to the standard version of RX10 you get a dedicated mouth de-clicker, and if you’re doing long-form audio this can save you hours of time and your sanity.
Small pause here just to say that mouth clicks are one of those things that voiceovers often get paranoid about, and worry unduly that they’re too clicky. They can spend hours getting rid of clicks that simply aren’t there. I think this may be a topic for a different blog, but for now please know that no one hears your clicks as much as you do.
The default setting of the mouth de-click seems to clear up most clicks from most people. But I’d suggest that backing it off a little from default can do as good a job and have less risk of taking out bits it shouldn’t. I usually back the sensitivity down to 3 from the default 4, and am more often than not happy with that.
So what happens if you overuse the mouth de-click?
Some people have reported that it can leave artefacts – a sort of metallic edge to the sound, but it’s more likely to misidentify some word endings as clicks. Words that end with a K sound that have been pronounced softly do sometimes lose the K. Less often it may be a T or P that gets chopped.
Let’s think about another couple of the modules while we’re here.
Voice de-noise
The voice de-noise does what it says it does. If you’ve recorded something in a noisy environment it identifies the voice and attenuates everything else. It can run in adaptive mode, so if the noise changes it can still be lowered.
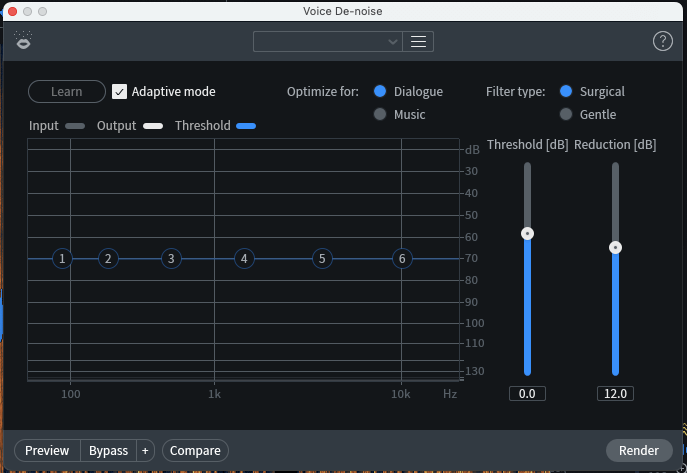
It’s a very powerful plugin. For voiceovers it can be used to lower your noise floor. Overused it will definitely leave artefacts in your audio.
So how should it be used?
For voiceovers I’ve only ever used it on audiobooks I’m mastering for ACX. Sometimes ACX books need a high degree of compression to meet the RMS specs, this raises the noise floor above normal, and possibly above ACX’s requirements. My first port of call would be to add an expander into the signal chain as this will lower the noise floor in the gaps and keep the noise floor low – no I wouldn’t use a noise gate. There is the possibility though that you may still be able to hear the noise floor below the read. This is where the voice de-noise could be useful. I’d use it to further reduce the noise floor by 2 or 3dB in the gaps to ensure it’s low enough to pass ACX, and this will also remove some of the noise from below the read, but shouldn’t be enough to result in artefacts. Gentle is the key. It’s a belt-and-braces approach with the expander doing the heavy lifting.
Breath control
There may be another blog in de-breathing a read, but for now all you’re getting is this bit!

We all worry about how best to remove breaths from a read – or indeed if we should. RX10 offers the breath control module to aid us in our strife! All well and good, but the best way to de-breath is still manually. Totally removing breaths with this kind of process can leave a read sounding lumpy – our breaths are very much a part of the rhythm of our read, and disturb the rhythm, and you run the risk of sounding like the dreaded ‘we’re getting Joyce from reception to do our advert’.
So is this a useful module?
It can be. I’m guessing that it’s really aimed at singers, or maybe lip-syncing/ADR where the words need to be in a fixed point in time. But for other voicing applications, it is possible to simply reduce the level of the breaths rather than remove them completely, so that’s what I’d advise. But even this comes with a big warning. It’s really easy to over-apply the breath control module. And if you do you’ll end up chopping out bits of words -particularly words that begin or end with F or TH sounds.
And the rest
There are many other useful modules in RX10. So here are my bits of general guidance as to how to get the best out of it.
As I’ve said already, use it sparingly and conservatively. The most important thing to do is preserve the quality of your audio. Don’t use it to the point where you’re doing damage. If you’re running the breath control or the mouth de-click and you’re getting rid of 80% of your problem before you notice undesirable effects you’ll still have saved yourself a ton of time. You’ll need to manually fix the other 20%, but your audio will still be pristine.
Don’t forget the help section
At the top right hand corner of each module is a question mark. Click it and it’ll take you straight to the right page of the user manual where you’ll find an explanation of what the process does and a description of every button and slider.
In conclusion
Here is the most important bit. We all run into an audio issue from time to time and need to use pieces of software like this. But you shouldn’t rely on RX10 to achieve professional quality audio.
It’s always better to solve a problem at the source.
RX10 is a tool best used subtly even though it can be used to the extreme when needed. You can use duct tape to fix a leaky pipe, but it’s better if the pipe doesn’t leak in the first place.
If you need more help and guidance with RX10 (or other software) then get in touch and we can arrange some 1-2-1 tuition. If you need help improving either the quality of your studio or the quality of your audio so you don’t need to buy RX10, I’d be very happy to help with that too!