

A couple of months ago I wrote part 1 of ‘What is compression and do voiceovers need it‘.
Part 2 covers how to set a compressor for VO and recommends a few compressors you may want to look at – so this is actually the useful bit.
How to use a compressor
The first thing to say is that compressors really aren’t at their best if you use one as part of a stack that you use to process every voice over you do. Although we can largely set and leave the parameters the crucial setting that actually controls how much compression is applied to your read needs adjusting to compensate for the level of your read as well as the dynamic range. I wrote about this as point 3 in this blog about stacks.
The key to using a compressor well is to keep your hand light. Over-compression that makes you sound like an old-school radio DJ actually makes audio harder to listen to. It works for radio (and radio-friendly music mixes) as radio is having to constantly fight for your attention, whereas your corporate narration, audiobook or IVR messaging already has people engaged so you need to treat them kindly. We can do this with the compressor settings below.
How to set a compressor
There are 5 basic controls for compression. They’re not always present and sometimes there are extras, but these 5 are the ones to really take notice of:
1. Threshold
The level at which the compressor kicks in. Anything below this threshold will be unaffected, the compression only happens when the level has exceeded the threshold.
2. Ratio
How much the volume is turned down by. Expressed as a ratio as the further over the threshold the audio is the more it’s turned down. The higher the ratio, the more attenuation occurs overall.
3. Attack
How fast the volume is turned down once the threshold has been exceeded.
4. Release
how fast the volume is returned to unity gain once the level has dropped back below the threshold.
5. Make-up gain
This is simply a volume knob that allows you to compensate for the drop in levels from the compression. This applies one change in volume across the whole audio file rather than the microsecond-by-microsecond adjustments that the compression process itself makes. Not always call make-up gain, sometimes just called gain, make-up, or on plugins there may be dry and wet faders/knobs instead.
The settings
For a dry voiceover – or as a good starting point for incorporating a VO in a mix – set the parameters as follows:
Ratio – 2:1
Attack – as fast as it will go
Release – around 700ms
Threshold – this one you need to adjust depending on your levels – the lower your levels the lower the threshold will need to be to get an equivalent amount of gain reduction. Try to use a compressor with a gain reduction meter on it and lower the threshold until you get 6dB of gain reduction maximum.
Make-up gain – theoretically if you’re reducing your gain by 6dB you should have the make-up set to 6dB, but this is a loose parameter and the gain can be used to compensate for lack of levels or other imperfections. Alternatively, if compression is the last bit of processing in your post-production regime you can leave the make-up gain set at 0dB and just normalise the audio.
Eh?
This is a very fast and dirty explanation. But here’s the thing. You can take what you understand of the above section, an old bit of your audio and just go nuts with it. In the digital realm, everything is undoable. Use the above as a starting point and take every parameter to extremes to see how it sounds and begin teaching yourself how to hear compression and how to set it correctly. Also (here’s an early sales pitch) I’m more than happy to have a Zoom session where I explain these parameters and how to use them more fully. I can use the software you use and therefore show you on the very compressor you could well be using.
A few recommended compressors
Below are a few compressors worth noting. Most are third-party plug-ins so will be available for whatever editor/DAW you’re using. The first one isn’t. The native compressors in your editor/DAW are perfectly adequate for VO (although some are better than others), so don’t feel you have to use one of the below compressors. Also there are hundreds – if not thousands – of other compressor plugins on the market, these are just some that I like &/or I think you might like.
Logic Pro native compressor
Every editor/DAW has compressors as part of its native suite of processing (except Izotope’s RX editor – but that’s for reasons). So I’m not spending time going through all those options, but Pro Logic’s compressor does deserve a special mention.
One thing we haven’t discussed are the different types of compressor. Most of these are based on emulations of old hardware pieces of kit and gave different sonic qualities to the compression – eg valve or transistors are known to give different ‘colouration’ to the sound of any piece of equipment. The strip of buttons on the Logic Pro native compressor switch between 7 different types of compressors and offer quite different results using exactly the same numbers. This can be a quick and easy way to match the compression to the project you’re working on without having to particularly understand the numbers!
Focusrite Red 3 compressor
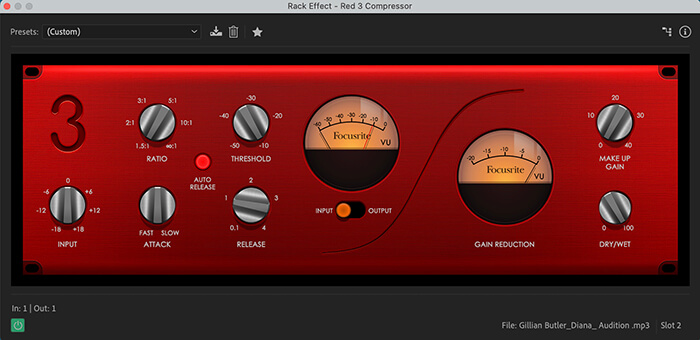
If you own a Focusrite interface and have registered it you can have this compressor for free. Just head to your account page and click on ‘My software’. It’s a very nice compressor and it has an ‘auto-release’- button that sets the release time automatically for you. There’s also a red needle in the level input meter that shows you where your threshold is set which can help to get that right.
Focusrite FAST compressor
Price = $90
Focusrite

While we’re on Focusrite here’s a compressor that’s really easy to use. Focusrite have recently released a suite of plugins that use AI to set the parameters and this is one of them. You simply add the effect to your chain, press the ‘learn’ button as you play the audio and it works out the parameters for you. You then have option about how much of the effect you want to use, or you can totally change the parameters if you wish. Quick and easy!
Waves RVox
Price = $79 (but often on sale)
waves.com
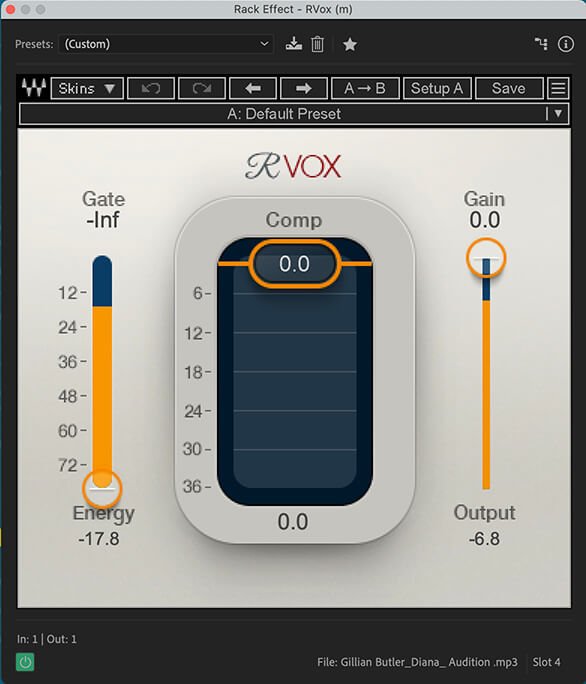
Another very simple to use compressor. This one has the ratio, attack and release set up specifically for vocals/voiceover, so all you need to worry about is setting the threshold. Plus it has a nice big gain reduction meter to make that bit easy-peasy too. There is also a gate to play around with on this, but we’re not thinking about gates today, so I won’t mention it. There is another waves compressor very similar to this called the RComp that has attack and release sliders if you want a bit more control.
Also worth noting that Waves nearly always have sales on, so although the ticket price is $79, you can usually get this for $29.
Softube Drawmer S73
Price = €45
Softube
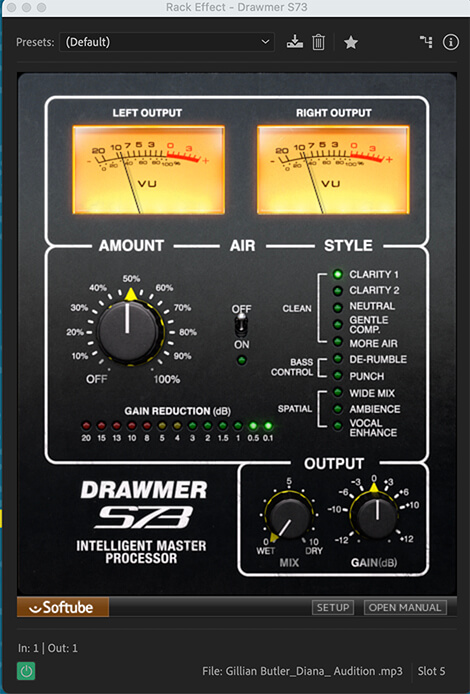
This one is an emulation of a piece of studio hardware from back in the day. Drawmer are a name renowned for their excellent hardware dynamic controllers.
Strictly speaking this isn’t really for compressing VOs, but it still yields some nice results and is easy to use. This is a multiband compressor designed for mastering audio with, but by the very fact of it being a mastering compressor it means it’s quite gentle. On the right are some pre-sets that change the ratio, attack, release and frequency bands of the compression algorithm(s) and can help shape the sound of the VO to match the project you’re working on. Changing the Amount knob alters the threshold. Easy to use and a very good sounding result.
Sonnox Oxford Dynamics
Price = £200
Sonnox Oxford Dynamics

This one pulls no punches. ALL the knobs are there in this compressor and you have other dynamics to play with as well. But it sounds great. I haven’t got anything else to say about this one really. I use it a lot. There are no frills with it, you just get good dependable sound.
Compression in 2 nutshells
So there you go. I hope this has helped you navigate the choppy waters of compression at least a little bit. I don’t expect it to make you a master of compression as most of that is all about training you ears to hear the difference in quality and knowing what to tweak to get the quality as you want it, and that take time.
As I said earlier I’m always happy to have a one to one session with people to go through this (or other audio production topics) and help voiceovers get the best out of their studios and kit. Have another read through the 2 blogs, have a play with whatever compressors you have at hand and then if you need more help getting your head around it, give me a shout.